
This guide is based on DASH documentation, links at the end. A big thank you to the DASH team.
Preparation
Load and sync your desktop SCC wallet, which will be referred to in this guide as the “controller wallet” or simply “controller”. If you don’t already have it download it from here: https://github.com/stakecube/StakeCubeCoin/releases/latest
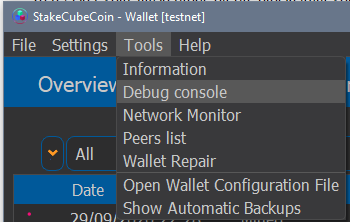
Open the Debug Console from the Tools menu (Windows version):
In the command entry box at the bottom of the console window, type the command:
bls generate
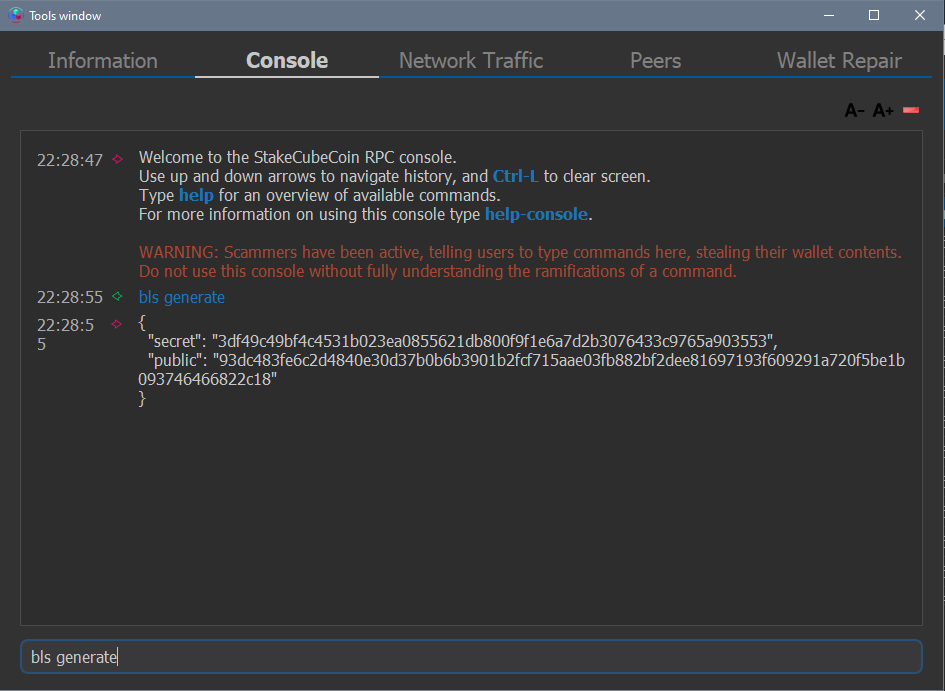
This will generate a bls key pair. A secret (also known as private) key and a public key. Do not share these with anyone.
Each masternode you install will require it’s own bls key pair. You cannot re-use a key pair for another masternode.
Make sure to keep a private note of these keys, you cannot retrieve them from the wallet later.
Log into your VPS and install the masternode. You will need the bls secret key for this step.
VPS setup
Note: This is a new chain and a new wallet based on a different codebase. If you already have SCC masternodes on your VPS you must remove them all and remove any and all copies of the multitool with:
rm sccmultitool.sh
Old version of the multitool will not work for setting up masternodes on the new chain. You must download a fresh copy of the new multitool – link below.
VPS setup and Masternode install using the SCC-multitool
You will need a VPS running Linux 18.04 with at least 1 CPU/core 2GB RAM and 25 GB HDD/SSD.
Once your VPS has been deployed login to it via Putty or similar SSH tool and then run the following commands to download the sccmultitool, make it executable and run the tool.
wget https://raw.githubusercontent.com/stakecube/SCC-multitool/master/sccmultitool.sh
chmod +x sccmultitool.sh
./sccmultitool.sh
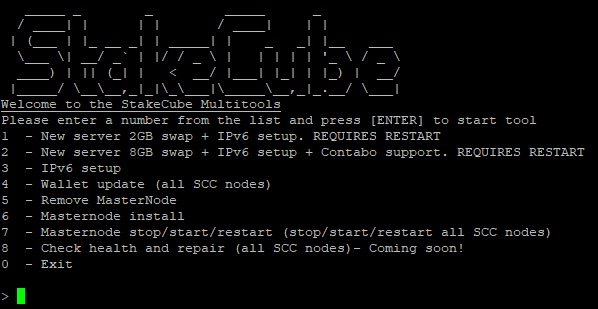
Menu options explained
1 & 2 – New server tool
This option sets up swap space which is needed to run multiple Masternodes, Enables IPv6 in netplan, downloads a customisable check script for checking on up to 5 SCC Masternodes and also checks your version of Linux is updated.
1 Sets up 2GB of swap space suitable for around 5 Masternodes (VPS dependant)
2 Sets up 8GB of swap space suitable for around 25 Masternodes (VPS dependant)
3 – IPv6 setup tool
Enables IPv6 in netplan. This option is for users who are using an existing VPS but need to setup IPv6 for SCC multinode.
4 – Wallet update tool
This option when run will update and restart all SCC Masternodes.
5 – Remove Masternode tool
Removes specified Masternode from VPS
6 – Masternode install tool
Installs SCC Masternode after user input for alias name, BLS priv key, RPC port and choice of IPv4 or IPv6 setup
7 – Masternode stop/start/restart tool
This option will stop/start/restart all SCC nodes after entering your choice.
8 – Check health and repair tool (Coming soon!)
Check health and repair tool will check on all SCC nodes found on the VPS and automatically repair where needed.
0 – exit
exits
Install using the sccmultitool
After you have run the sccmultitool using the command ./sccmultitool.sh type “6” and then press enter.
First you are asked for an alias/name, this must be all lower case, contain no special characters and must contain “scc” somewhere in the alias. For example sccmn1 or mn1scc. input you chosen alias name and then press enter.
Then you need to input your BLS private key then press enter.
Next you need to enter an RPC port. The default is shown and if you are installing multiple Masternodes you will need to use a unique RPC port each time you setup
Finally you are asked if you want to setup using an IPv4 or IPv6 address.
You should install your first node on the VPS with an IPv4 address and then subsequent masternodes with IPv6 addresses.
The Masternode install tool will now install the node using the given information you will see it working and it will tell you when it is done then give you information on the Masternode and checking on the Masternode.
If you used sccmn1 as your alias you would then enter the command “sccmn1 -getinfo” or “sccmn1 masternode status”
Now the masternode is installed on your VPS you will need to go back to your controller wallet and the debug console.
Controller wallet setup
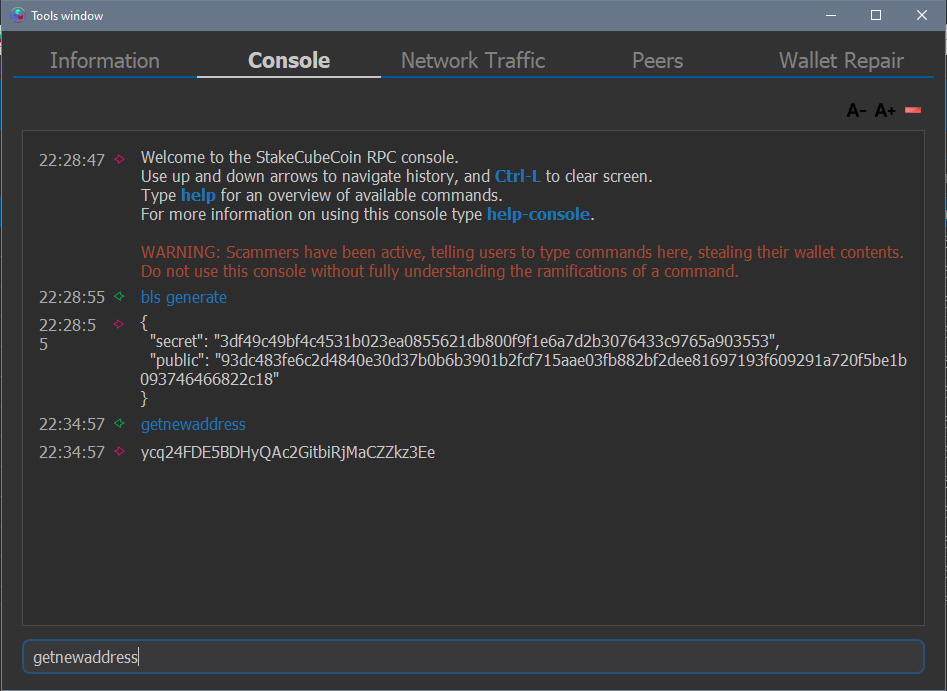
These nodes can have an operator and an owner. Usually this is the same person: you. The setup of these nodes requires several new SCC addresses. Create new addresses with the command:
getnewaddress
The address will be provided on the next line of the console.
Use this method to generate addresses for the following purposes:
“CollateralAddress” – This is the address you will send exactly 1000 SCC to which will be locked by your controller wallet for as long as you want to keep the node running for. This address can also be used as the “payoutAddress” but nothing else.
“ownerKeyAddress” – This must be new and unused. This is not the collateral address. This address can also be used as the votingKeyAddress.
“votingKeyAddress” – This address can be the same as the ownerKeyAddress above, or a new address as you wish. Must not be the collateral address.
“payoutAddress” – This is the address that the masternode rewards will go to (also known as the owner’s payout address) unless an operator reward is setup. This does not have to be unique for the individual masternode. If you wish you can have all your rewards sent to a single address. This can be the collateral address if you wish to track your rewards from multiple nodes more easily. Note: it is not advisable to have the rewards sent to your SC deposit address as this could change at some point in the future requiring your masternode data on the blockchain to be updated.
“feeSourceAddress” – This address must have sufficient funds in it to fund the protx transactions. Not recommended to use the collateral address for this.
More than one masternode can not share the same collateral address, ownerKeyAddress or votingKeyAddress.
The private keys for the ownerKeyAddress and feeSourceAddress must be in your controller wallet that is submitting the protx.
Send exactly 1000 SCC to your Collateral Address. Note the TXID and TXindex for the steps below.
To register your masternode on the blockchain you will need to enter three commands into the debug console of your StakeCubeCoin wallet. The first command is rather long and needs information to be gathered. It is recommended to gather the info first in a text file.
The first command prepares an unsigned ProRegTx transaction.
protx register_prepare collateralHash collateralIndex ipAndPort ownerKeyAddr operatorPubKey votingKeyAddr operatorReward payoutAddress feeSourceAddress
collateralHash: The TXID of the 1000 SCC collateral funding transaction
collateralIndex: The output index of the 1000 SCC funding transaction (either 0 or 1)
ipAndPort: Masternode IP address and port, in the format x.x.x.x:40000 for IPv4. For IPv6 it will be in the format [x:x:x:x:x:x:x:x]:40000 note the “[ ]” surrounding the IP address and the seperator is a “:” rather than a “.” For mainnet the port must always be 40000
ownerKeyAddr: The new SCC address generated above for the owner/voting address
operatorPubKey: The BLS public key generated above
votingKeyAddr: The new SCC address generated above, or the address of a delegate, used for proposal voting
operatorReward: The percentage of the block reward allocated to the operator as payment – this is usually “0” (zero) as you will usually want 100% of the reward going to you, the owner
payoutAddress: A new or existing SCC address to receive the owner’s masternode rewards
feeSourceAddress: An address used to fund ProTx fee. Must cointain at least 1 SCC.
This command:
protx register_prepare collateralHash collateralIndex ipAndPort ownerKeyAddr operatorPubKey votingKeyAddr operatorReward payoutAddress feeSourceAddress
“protx register_prepare cbeec127dcbb8979f76850140272c6e083eea579292124558308990b7a7a15cf 1 [2a02:c207:3005:3682::19]:40000 yh7hjykSt1ZK4wm54uQWgNQxsNsA1VZY6L 10d4ec11745a80b5828027ddf2d5baa4d24a2d64859fd9dc9d60269bcacccb4e9a964b36c3e01ee8533a4679135c38cc yh7hjykSt1ZK4wm54uQWgNQxsNsA1VZY6L 0 yRG1d4phqxD1FvdxLmCiYyy5RFw9JvqqbD yTdZPbkXBBTCQ86rRdBjAujiEJdHRddG6Q”
will look like this in the console:
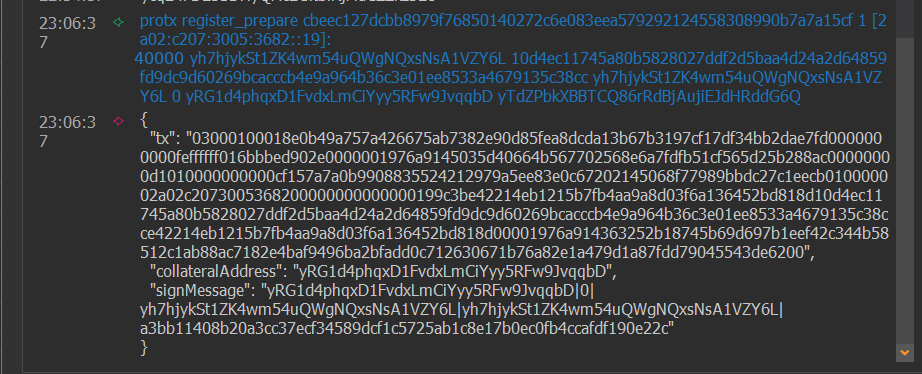
You must use port 40000 for all of your mainnet masternodes or they will not work.
Any linebreaks in the text or screenshot above do not exist in the command entered. They are due to the way the document and console display long lines.
The first command was for an unsigned transaction, now it must be signed. This command will do that:
signmessage collateralAddress signMessage
Both of the input items for the “signmessage” command come from the output of the first command:
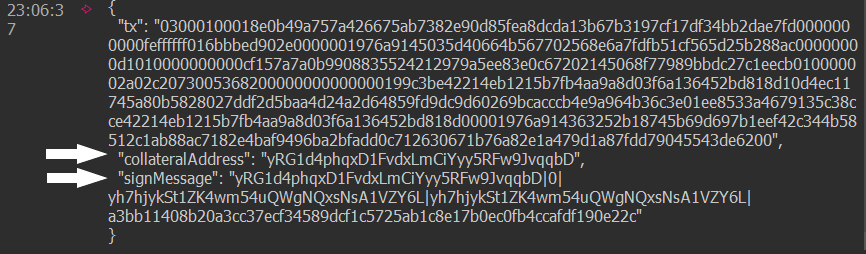
Example:
signmessage yRG1d4phqxD1FvdxLmCiYyy5RFw9JvqqbD yRG1d4phqxD1FvdxLmCiYyy5RFw9JvqqbD|0|yh7hjykSt1ZK4wm54uQWgNQxsNsA1VZY6L|yh7hjykSt1ZK4wm54uQWgNQxsNsA1VZY6L|a3bb11408b20a3cc37ecf34589dcf1c5725ab1c8e17b0ec0fb4ccafdf190e22c
Note, do not include the “” when copying from the output of the previous command.

The final step to registering your masternode on the blockchain is to submit the transaction to the blockchain.
protx register_submit tx sig
The “tx” is prt of the output of the first command (protx register_prepare) and the “sig” is the output from the second command (signmessage).
Tx:
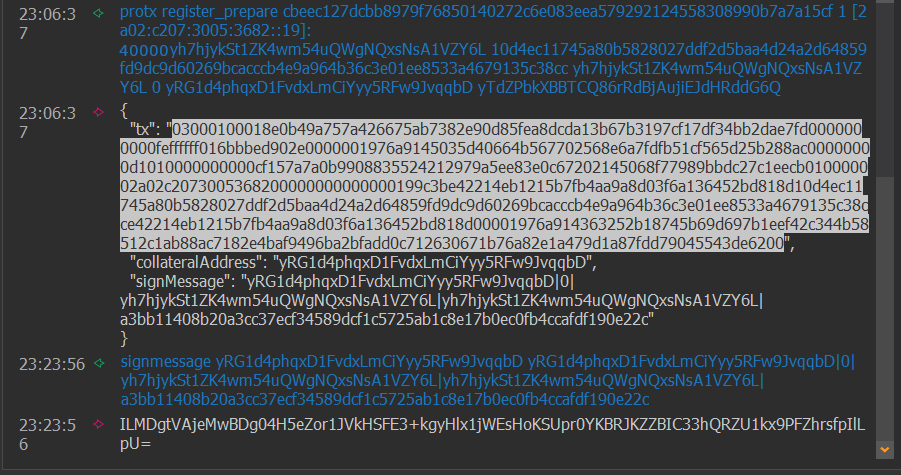
Copy the highlighted part then paste it into the input box after “protx register_submit”. Next highlight the sig:

Copy the sig and paste it in after the tx value from the step before (remember to put a space between the two). Don’t miss the “=” from the end of the sig.
Once submitted you will receive a confirmation hash back:
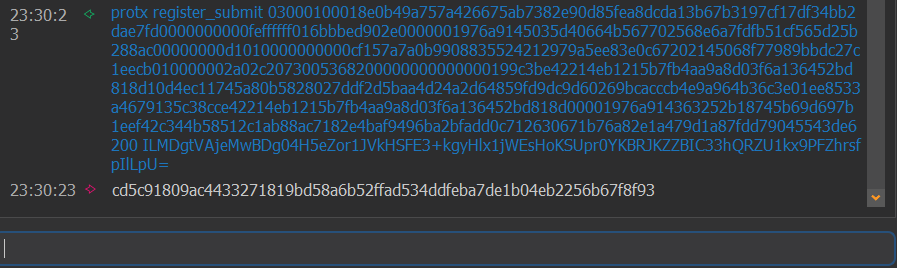
You do not need to keep a record of that console output. After a few blocks you should see your new masternode appear in the masternode tab of your controller.
Default view in the masternode tab is of all masternodes. Tick the orange box next to “My masternodes only” to see only your nodes.

You can see the Last Paid and Next Payment columns in this view to monitor your masternode payouts.
Repair and maintenance
If you see a number in the PoSe Score (Proof of Service Score) column keep an eye on it and if the number increases then check your masternode on your VPS, there is likely an issue with it. If the PoSe Score decreases then it’s likely there was an issue with the node but it is now resolved.
If a node shows “POSE_BANNED” in the PoSe Score column it means your masternode will not receive another reward until it is fixed. Once you have fixed the issue on your VPS you will need to send an update transaction to the chain to let it know the node is back online. The “protx update_service” command does this. This transaction type can also be used to update details about a node, for example when moving it to a different VPS and therefore a different IP address. Note that changes to the bls operator key or the IP address will reset the node’s position in the payment queue. Changing any of the addresses will not reset the payment position in the queue.
protx update_service proTxHash ipAndPort operatorKey operatorPayoutAddress feeSourceAddress
The definitions of the data items for this command can be found in the previous steps used to setup the node. You may no longer have some of these details but they can be found in the wallet (except for the “operatorKey” which is your bls private key). It is important to enter just “” instead of the operatorPayoutAddress. The command will rather look like this:
protx update_service proTxHash ipAndPort operatorKey “” feeSourceAddress
In the Masternodes tab find the line for the node you wish to update and right click anywhere on that line. Select “Copy ProTxHash” to get the proTxHash value required by the above command. For the example node it copies:
cd5c91809ac4433271819bd58a6b52ffad534ddfeba7de1b04eb2256b67f8f93
It’s not needed for the above command but if you ever need the TXID and TXindex for the collateral transaction use the “Copy Collateral Outpoint” option from the right click menu. For the example node in this guide the following is copied:
cbeec127dcbb8979f76850140272c6e083eea579292124558308990b7a7a15cf-1
The TXID is shown with “-1” at the end which is the TXindex.
Command summary:
bls generate

getnewaddress

protx register_prepare collateralHash collateralIndex ipAndPort ownerKeyAddr operatorPubKey votingKeyAddr operatorReward payoutAddress feeSourceAddress

signmessage collateralAddress signMessage

protx register_submit tx sig

protx update_service proTxHash ipAndPort operatorKey operatorPayoutAddress feeSourceAddress
Thanks:
With great thanks to the DASH team. This guide is based on their help pages here:
https://docs.dash.org/en/stable/masternodes/setup.html
https://docs.dash.org/en/stable/masternodes/maintenance.html